How to Test and Replace a Refrigerator Capacitor?
A refrigerator capacitor plays a vital role in ensuring the efficient operation of your appliance. It helps start the compressor and maintains steady performance. If your refrigerator isn't cooling properly, a faulty capacitor may be the culprit. Recognizing the signs of a malfunctioning capacitor is crucial for timely action.
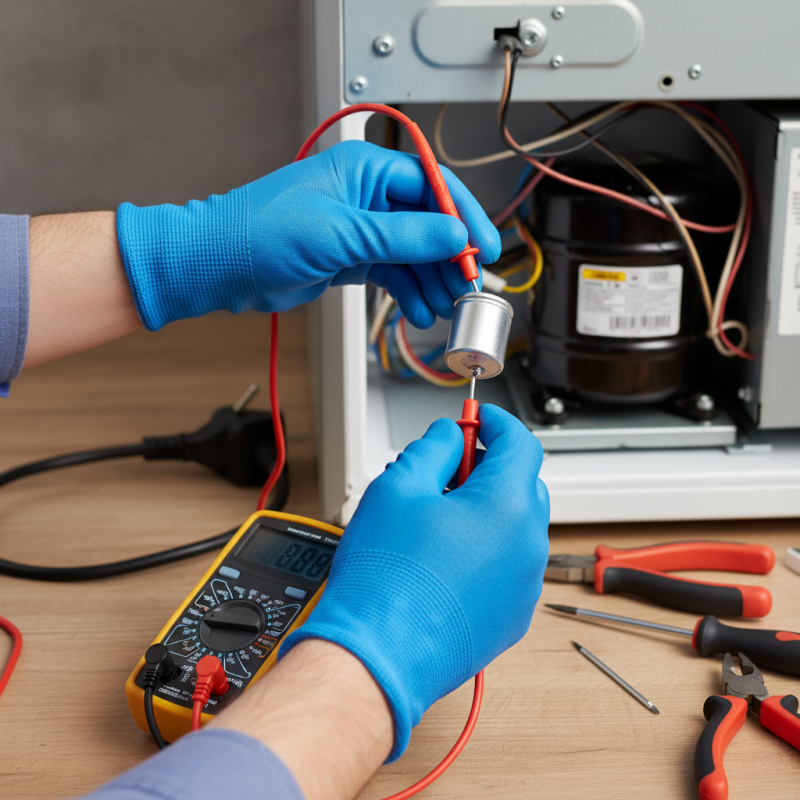
Testing a refrigerator capacitor is a straightforward process. You’ll need a multimeter and some basic tools to check for issues. However, undertaking this task can sometimes feel overwhelming due to safety concerns. Always remember, safety should come first. Disconnect the power supply before starting any tests.
Replacing a refrigerator capacitor may seem daunting, but it can save you time and money. Knowing when and how to replace the capacitor is essential. With the right guidance, you can restore your refrigerator's functionality. However, even after replacement, be aware that not everything may go as planned. It’s a learning experience that requires patience and attention to detail.
Understanding the Role of a Capacitor in Your Refrigerator
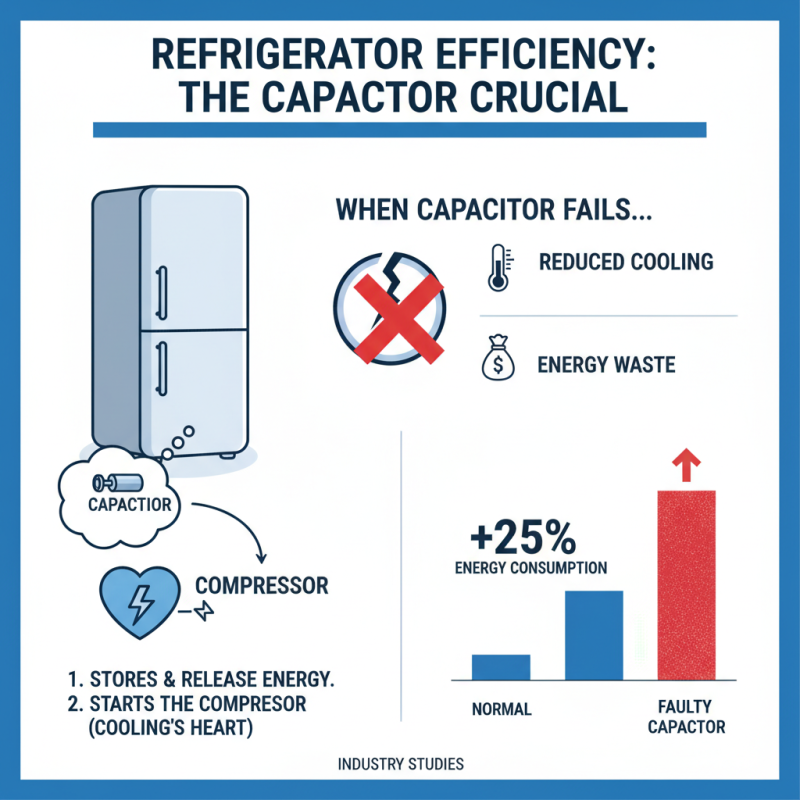
A capacitor is crucial in a refrigerator's efficiency. It stores and releases energy to start the compressor, the heart of cooling. When the capacitor fails, the compressor may struggle to start. This can lead to reduced cooling efficiency and energy waste. According to industry studies, a malfunctioning capacitor can increase energy consumption by up to 25%.
Recognizing capacitor issues can save time and money. Signs like unusual humming or clicking noises may indicate failure. If the fridge fails to cool effectively, the capacitor could be to blame. Regular maintenance can extend its lifespan. However, it's easy to overlook this small yet vital component.
Replacing the capacitor can be daunting. It's essential to discharge it properly before handling. Errors in this process may lead to electrical shocks. Familiarizing yourself with safety protocols is necessary. Although tackling it yourself is possible, some may prefer professional assistance for peace of mind. Each step in this process requires careful attention. Neglecting these details could result in complications down the line.
Signs of a Failing Refrigerator Capacitor
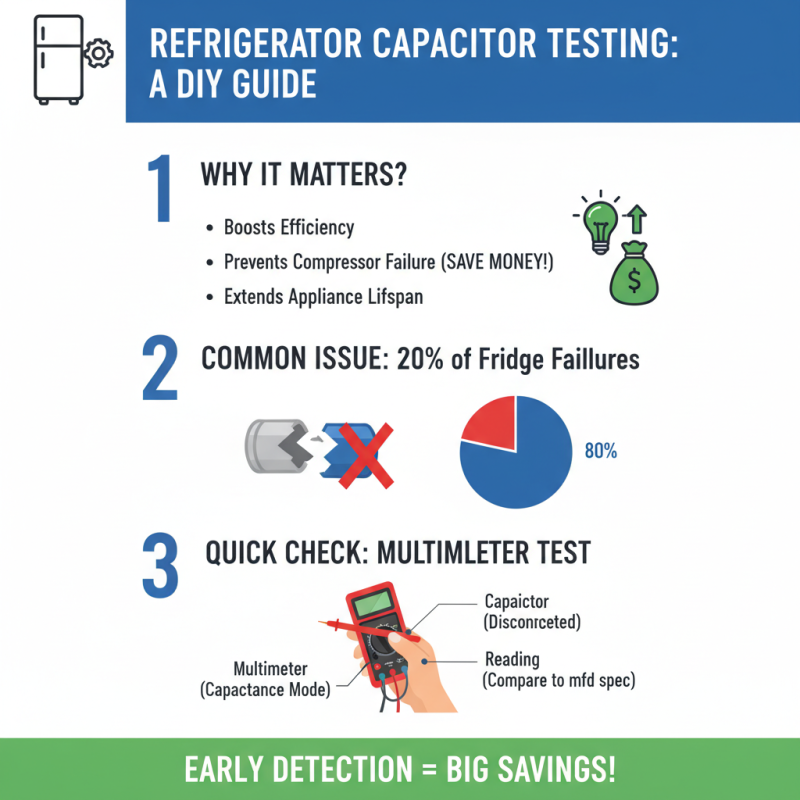
A failing refrigerator capacitor can lead to various issues. Common signs include the fridge not starting, irregular cycling, or overheating. If you notice any of these, it may be time for a check. According to industry data, nearly 15% of refrigerator failures are linked to capacitor issues.
One major indication is unusual noise. This could mean the capacitor is struggling. You might hear humming or clicking sounds. These sounds signal potential failure. Moreover, if the light inside dims when the motor runs, take action. This inconsistency isn’t just annoying; it can indicate deeper problems.
Tip: Regularly inspect the wiring and connections around your refrigerator. Loose connections may also mimic capacitor problems.
Another sign is warm spots on the refrigerator's exterior. Overheating components can result from a capacitor not functioning well. You may feel heat near the condenser or compressor. It’s essential to monitor these changes. Overheating could shorten your fridge's lifespan.
Tip: Document any unusual patterns. Noticing small changes can help you catch issues early. Keep a log of noises, temperature fluctuations, or performance dips. This will provide necessary information when troubleshooting.
Tools and Safety Precautions for Testing a Capacitor
When testing a refrigerator capacitor, safety should always come first. Start by unplugging the unit to avoid electric shock. Wear insulated gloves and goggles to protect yourself. Capacitors can retain a charge even after disconnection, so it's vital to discharge them properly using a resistor before testing. Studies show that improper handling of capacitors can lead to serious injuries.
For testing, you’ll need a multimeter, which measures capacitance. Set it to the correct mode, and connect the probes to the capacitor terminals. A functioning capacitor will show a reading close to its rated capacitance. If the value is significantly lower or reads '0', it indicates a faulty capacitor and requires replacement. Remember, a healthy capacitor typically lasts between 10 to 15 years, but factors like heat can shorten its lifespan.
Tip: Always double-check the capacitor specifications. Use a meter with a capacitance rating suitable for the capacitor you're testing. Insufficient or inappropriate tools can lead to inaccurate readings. Additionally, document the readings. This could help you identify patterns of failure in your refrigerator. Poor performance could mean it’s time for an upgrade.
How to Test and Replace a Refrigerator Capacitor? - Tools and Safety Precautions for Testing a Capacitor
| Tool/Item |
Purpose |
Safety Precautions |
| Multimeter |
Measuring voltage, resistance, and capacitance |
Ensure device is unplugged before testing |
| Insulated Screwdriver |
Opening the capacitor cover or connections |
Use insulated tools to prevent electric shock |
| Safety Goggles |
Protect eyes from potential sparks or debris |
Always wear goggles when working with electrical components |
| Gloves |
Protection from electrical shock and sharp edges |
Use insulated gloves for added safety |
| Capacitance Tester |
Specific testing of capacitor functionality |
Follow manufacturer instructions to avoid misuse |
Step-by-Step Guide to Testing a Refrigerator Capacitor
Testing a refrigerator capacitor can seem daunting. However, it is essential for maintaining your appliance's efficiency. A faulty capacitor can cause the compressor to fail, impacting energy consumption. According to industry reports, a defective capacitor accounts for nearly 20% of refrigeration failures. Identifying these issues early can save on energy bills and extend appliance life.
To test a refrigerator capacitor, you need a multimeter. First, ensure the refrigerator is unplugged. Discharge the capacitor by using a resistor. Use the multimeter to measure resistance across the terminals. A good capacitor typically shows a high resistance reading. If the reading is low or fluctuates, the capacitor is likely failing.
Replacing a faulty capacitor is straightforward. Look for a direct replacement that matches voltage and microfarad rating. Remove the old capacitor and install the new one, ensuring correct polarity. Tighten all connections securely. Reports show that capacitor replacement can restore up to 90% of the refrigerator's efficiency. However, always reflect on the decision to replace rather than repair. Sometimes, deeper issues exist. Always prioritize safety and consult professionals if unsure.
How to Properly Replace a Faulty Refrigerator Capacitor
Replacing a faulty refrigerator capacitor can seem daunting. However, it is quite manageable with the right approach. Begin by unplugging the refrigerator to ensure safety. Make sure to have a multimeter handy. This tool helps in diagnosing if the capacitor is defective.
Once you've located the capacitor, it’s important to remember its position before removal. Take a picture if needed. Carefully disconnect the old capacitor. Observe any signs of wear. Look for bulging or leakage, indicating it needs replacement. It’s easy to overlook these details, but they matter.
Choose a suitable replacement capacitor. Match the specifications exactly. New capacitors may look slightly different. Ensure the connections are secure. During installation, don’t rush. Errors can lead to further issues. Check your work before plugging the refrigerator back in. Pay attention to any odd sounds or smells after replacement. It's always wise to observe the appliance for a while.