


Author:
-
Position:
General Manager of Foreign Trade Department, Taojun Refrigeration -
Professional Experience:
Engaged in international trade within the refrigeration industry since 2004.
Expert in brand strategy and omni-channel marketing, having led three multi-million yuan projects that boosted brand exposure by over 200%.
-
Core Competencies:
Proficient in data analysis and user growth strategies.
Skilled in SEO/SEM and social media management tools.
Experienced in cross-departmental collaboration and team leadership.
-
Philosophy:
"Data-driven decisions, creativity-powered branding." Committed to achieving business value and user experience excellence through refined operations. -
Vision:
Eager to collaborate with partners to explore emerging market opportunities and set industry benchmark cases.
Contact Us to Find More Products
How to Overcome Installation Problems with Universal AC Brackets
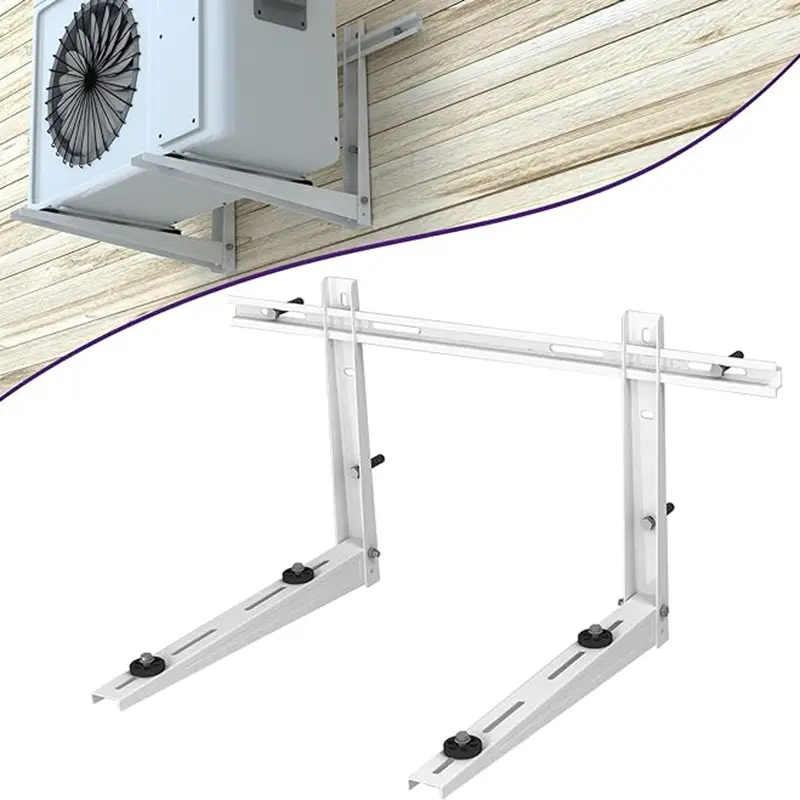
I’ve always believed that a sturdy foundation is the key to success, whether in life or in installing an air conditioner. Universal AC brackets offer that foundation. They’re not just tools; they’re peace of mind, ensuring every outdoor unit stays secure. Universal AC Brackets: Compatible with All Major Air Conditioner Brands, make installation stress-free and adaptable. With the right approach, you can overcome any challenges and create a safe, reliable setup for your AC system.
Key Takeaways
- Universal AC brackets give strong support to air conditioners, keeping them steady and safe during setup.
- Make sure the bracket fits your AC by checking its weight and size to prevent problems.
- Be ready with tools like a tape measure, drill, and level to make installation easier.
- Cleaning and checking the bracket often can make it last longer and work better.
- Fix problems like uneven placement or shaking quickly to keep the setup safe and working well.
Universal AC Brackets: Compatible with All Major Air Conditioner Brands
Key Features of Universal AC Brackets
When I first discovered universal AC brackets, I was amazed by their versatility. These brackets are crafted from high-quality stainless steel, making them durable and resistant to rust. They’re designed to handle outdoor conditions like wind, rain, and vibrations. What stood out to me was their ability to support air conditioning units of various sizes and weights. This flexibility ensures that no matter the brand or model of your AC unit, these brackets can provide a stable and secure foundation.
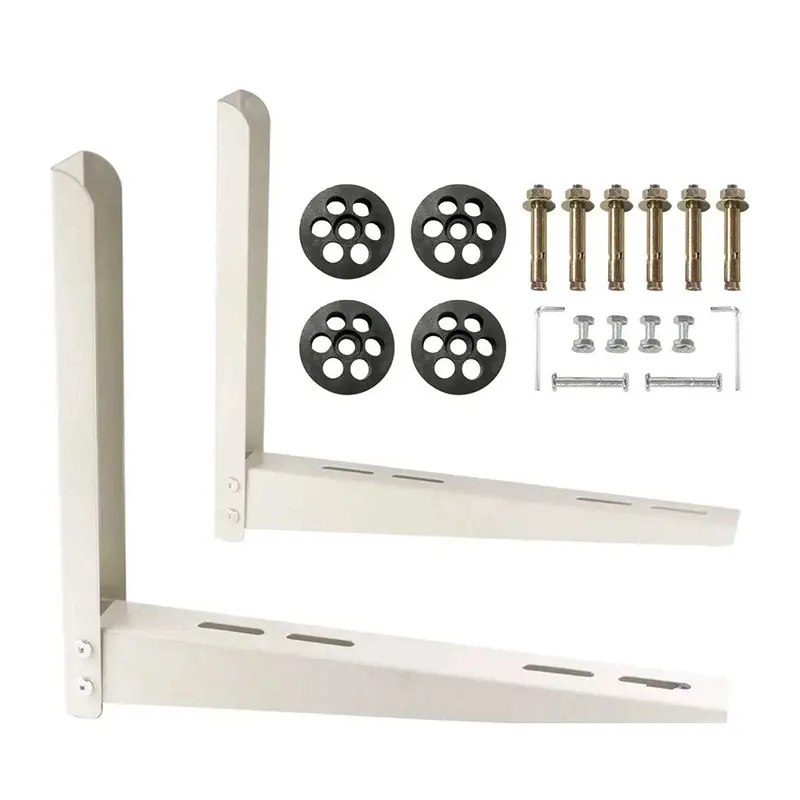
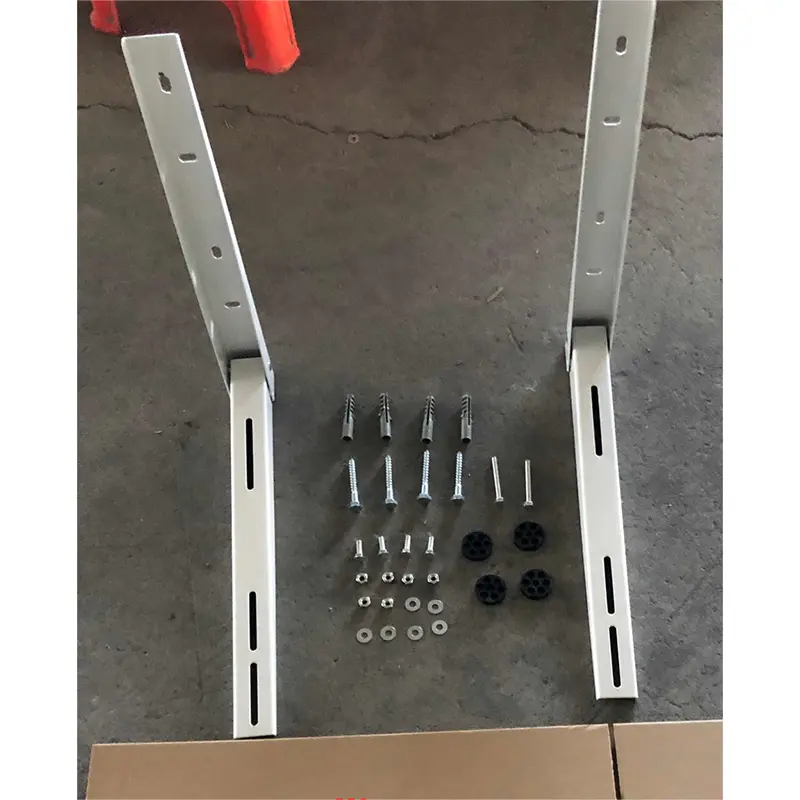
Another feature I love is the inclusion of rubber pad shock absorbers. These pads reduce vibrations, keeping the AC unit steady and quiet. The brackets also come with all the necessary hardware, like bolts, washers, and concrete anchors, making installation straightforward. Their rounded corner design adds an extra layer of safety, protecting your hands during setup. These thoughtful details make universal AC brackets a reliable choice for any homeowner.
Why Compatibility Matters for Installation
I’ve learned that compatibility is the cornerstone of a successful installation. Choosing the right bracket ensures your AC unit stays secure and functions efficiently. Here’s what I always consider:
- The type of air conditioner, whether it’s a window unit or a split system.
- The weight and dimensions of the AC unit.
- Measuring the unit and comparing it with the bracket’s dimensions.
By addressing these factors, I avoid issues like instability or misalignment. A compatible bracket not only simplifies the installation process but also enhances the longevity of the AC system.
Common Problems Solved by Universal AC Brackets
Universal AC brackets solve many challenges I’ve faced during installations. They eliminate the risk of bracket failure by providing a stable base, even on uneven surfaces. Their rust-resistant material ensures long-term durability, while the shock absorbers minimize noise and vibrations. These brackets also protect the AC unit from debris, dirt, and harsh weather conditions. With these solutions, I feel confident that my AC system will perform reliably for years.
Preparing for a Smooth Installation
Essential Tools and Materials
I’ve learned that having the right tools and materials can make or break an installation. Preparation saves time and ensures a smoother process. Here’s a quick guide to the essential tools I always keep handy:
| Tool | Overview | Price Range | Recommended Brands |
|---|---|---|---|
| Tape Measure | Measures dimensions and distances. | $10–$30 | Stanley, Milwaukee, DEWALT |
| Torpedo Level | Ensures proper alignment of equipment. | $10–$30 | Stanley, Empire, Johnson Level |
| Drill | Drills holes in various materials. | $80–$250 | Bosch, Milwaukee, DEWALT |
| Hex Keys | Tightens or loosens hexagonal bolts. | $5–$20 | Bondhus, Klein Tools, TEKTON |
| Rubber Pad Shock Absorbers | Reduces vibrations and stabilizes the AC unit. | Included | Provided with Taojun Brackets |
These tools, combined with the hardware included in the Universal Wall Mounted AC Bracket package, ensure a seamless installation. I always double-check that everything is on-site before starting to avoid unnecessary delays.
Pro Tip: Keep a telescoping magnetic pickup tool nearby. It’s a lifesaver for retrieving dropped screws in tight spaces!
Selecting the Best Installation Location
Choosing the right location is critical for both performance and safety. I always start by consulting the manufacturer’s recommendations for clearance and placement. Then, I evaluate the property to find a shaded area with minimal obstructions. This ensures proper airflow and reduces strain on the AC unit.
Here’s a simple checklist I follow:
- Ensure the location complies with local building codes.
- Avoid placing the unit near combustible materials.
- Check for easy accessibility for future maintenance.
- Seek professional advice if unsure about the placement.
By following these steps, I’ve consistently achieved optimal performance and longevity for air conditioning systems.
Ensuring Compatibility with Your Wall Type and AC Unit
Not all walls are created equal, and I’ve learned this the hard way. Before installation, I always verify that the wall can support the weight of the AC unit and bracket. Cement, brick, and solid walls work best with the Universal Wall Mounted AC Bracket. For other wall types, I consult a professional to ensure safety.
Matching the bracket to the AC unit is equally important. I measure the unit’s dimensions and weight, then compare them to the bracket’s specifications. This step ensures stability and prevents misalignment. With Universal AC Brackets: Compatible with All Major Air Conditioner Brands, I’ve found this process straightforward and stress-free.
Note: Always test the wall anchors before mounting the bracket to confirm they’re secure.
Step-by-Step Installation Process
Assembling the Bracket Components
When I first started installing air conditioners, assembling the bracket components felt like solving a puzzle. But with the right approach, it became a straightforward and rewarding task. The Universal Wall Mounted AC Bracket comes with all the necessary parts, including bolts, washers, nuts, and rubber pad shock absorbers. I always begin by laying out all the components on a flat surface. This helps me visualize the assembly process and ensures nothing is missing.
To assemble the bracket, I follow these steps:
- Identify the main frame and support arms.
- Attach the support arms to the main frame using the provided bolts and washers.
- Tighten the connections with a wrench or hex key, ensuring they are secure but not overly tight.
- Install the rubber pad shock absorbers on the support arms. These pads reduce vibrations and protect the AC unit during operation.
Pro Tip: Double-check the alignment of the components before tightening the bolts. This small step saves time and prevents misalignment issues later.
By taking my time and following these steps, I ensure the bracket is ready for the next phase of installation.
Securing the Bracket to the Wall or Surface
Securing the bracket to the wall is a critical step. It determines the stability and safety of the entire setup. I always start by selecting a solid, load-bearing wall, such as cement or brick, as recommended for the Universal Wall Mounted AC Bracket. Once I’ve chosen the location, I mark the drilling points using the bracket as a template.
Here’s my process for securing the bracket:
- Use a tape measure to confirm the alignment of the bracket with the marked points.
- Drill holes into the wall at the marked locations. I use a drill bit suitable for the wall type to ensure clean and precise holes.
- Insert the concrete anchors provided in the package into the drilled holes.
- Position the bracket against the wall and align it with the anchors.
- Secure the bracket by tightening the bolts into the anchors.
Note: I always use a torpedo level to check the alignment of the bracket before tightening the bolts. A level bracket ensures the AC unit operates efficiently and safely.
This step might seem daunting, but with the right tools and a methodical approach, it becomes manageable. The Universal AC Brackets: Compatible with All Major Air Conditioner Brands make this process even easier, thanks to their user-friendly design.
Properly Mounting and Stabilizing the AC Unit
Mounting the AC unit onto the bracket is the final step. It’s also the most satisfying because it brings the entire setup together. Before lifting the unit, I ensure the bracket is securely fastened and the rubber pad shock absorbers are in place.
Here’s how I mount and stabilize the AC unit:
- With the help of a friend, I lift the AC unit and carefully place it onto the bracket.
- I align the unit with the support arms, ensuring it sits evenly on the rubber pads.
- Using the provided hardware, I secure the unit to the bracket. This step prevents the unit from shifting or falling during operation.
- Finally, I test the stability of the setup by gently shaking the unit. If it feels secure, I know the installation is complete.
Inspiration: Seeing the AC unit securely mounted gives me a sense of accomplishment. It reminds me that with patience and the right tools, any challenge can be overcome.
By following these steps, I’ve successfully installed air conditioning systems in various settings. The Universal Wall Mounted AC Bracket’s thoughtful design and compatibility with all major air conditioner brands make the process smooth and stress-free.
Troubleshooting Installation Challenges
Even with careful preparation, challenges can arise during installation. I’ve faced my fair share of hiccups, but I’ve learned that every problem has a solution. Here’s how I tackle common issues like misalignment, uneven surfaces, and wobbly installations.
Fixing Misalignment Issues
Misalignment can compromise the stability and efficiency of your AC unit. I’ve found that addressing this issue early ensures a secure and professional setup. Here are some effective methods I’ve used to fix misalignment:
| Method Type | Description |
|---|---|
| Physical Corrections | Use external sensors to estimate misalignment and motors to align the bracket. This method is precise but may require additional tools. |
| Adjustable Bracket | Opt for brackets with adjustable designs. These allow you to correct misalignment at specific angles after measuring the issue. |
| Algorithmic Corrections | Use alignment algorithms for end-of-line (EOL) adjustments. These are particularly useful in professional or service contexts. |
I always start by identifying the root cause of the misalignment. If the bracket itself is adjustable, I make small corrections until the unit sits perfectly level. For more complex cases, I rely on tools like a torpedo level or external sensors to guide my adjustments. Taking the time to fix misalignment not only improves the appearance of the installation but also ensures the AC unit operates efficiently.
Tip: Always double-check the alignment after making adjustments. A small error can lead to bigger problems down the line.
Stabilizing Brackets on Uneven Surfaces
Uneven surfaces can make installation tricky, but I’ve discovered techniques that work wonders in stabilizing brackets. Here’s my step-by-step approach:
- Initial Resilient Archwire: I use a rectangular archwire for a few months to regain control and achieve proper alignment. This helps stabilize the bracket on uneven surfaces.
- Settling the Occlusion: I incorporate specific wires and elastics to ensure correct interdigitation and midline coordination. This step enhances the stability of the bracket.
- Final Detailing and Finishing Bends: For minor corrections, I prefer adding finishing bends rather than repositioning the bracket. This method saves time and ensures precision.
These techniques have helped me overcome challenges with uneven surfaces. By focusing on small, incremental adjustments, I’ve achieved stable and secure installations even in less-than-ideal conditions.
Pro Tip: Use rubber pad shock absorbers included in the Taojun Universal Wall Mounted AC Bracket package. They not only reduce vibrations but also help stabilize the unit on uneven surfaces.
Addressing Loose or Wobbly Installations
A loose or wobbly installation can be frustrating, but it’s usually easy to fix. I’ve encountered this issue several times, and here’s how I address it based on the cause:
| Cause | Symptoms | Solutions |
|---|---|---|
| Uneven Leg | Bracket wobbles or tilts under pressure | Adjust the leg length or add padding under the shorter leg. |
| Uneven Frame | Bracket rocks from side to side | Check and adjust the frame alignment. |
| Combination of Uneven Frame and Leg | Wobbling from multiple sources | Address both uneven legs and frame alignment simultaneously. |
| Incorrect Leg Installation Sequence | Bracket feels unstable or inconsistent | Remove and reinstall the legs in the correct sequence. |
| Loose Bolt | Bracket wobbles even when not in use | Tighten all bolts and screws to secure the installation. |
When I notice a wobble, I start by inspecting the bolts and screws. Loose hardware is often the culprit, and tightening them usually resolves the issue. If the problem persists, I check the frame and legs for alignment. Adding padding or adjusting the leg length can make a significant difference.
Inspiration: Fixing a wobbly installation reminds me that persistence pays off. Every adjustment brings me closer to a stable and reliable setup.
By addressing these challenges head-on, I’ve gained confidence in my ability to handle any installation issue. The Taojun Universal Wall Mounted AC Bracket’s thoughtful design makes troubleshooting easier, ensuring a secure and long-lasting installation.
Maintenance Tips for Long-Term Performance
Regular Inspections for Wear and Tear
I’ve learned that regular inspections are the secret to keeping an air conditioning system running smoothly. Every year, I check the exterior condition of the equipment. This helps me spot any visible damage or wear before it becomes a bigger problem. Testing for refrigerant leaks is another essential task. It ensures the system operates efficiently and prevents environmental harm.
Here’s a quick guide I follow for annual maintenance:
| Maintenance Task | Frequency |
|---|---|
| Inspect exterior condition of equipment | Annually |
| Test for refrigerant leaks | Annually |
| Inspect seals and valves for wear | Annually |
| Document any refrigerant leaks in logbook | As needed |
During service visits, I focus on more detailed tasks. Checking refrigerant levels, cleaning coil fins, and tightening electrical connections keep the system in top shape. Lubricating moving parts ensures smooth operation and prevents unnecessary strain.
| Maintenance Task | Frequency |
|---|---|
| Check refrigerant levels | During each service visit |
| Clean and straighten coil fins | During each service visit |
| Inspect gas connections for leaks | During each service visit |
| Tighten electrical connections | During each service visit |
| Lubricate moving parts | During each service visit |
Tip: Keep a logbook to track inspections and repairs. It’s a simple way to stay organized and ensure nothing gets overlooked.
Preventing Rust and Corrosion
Rust and corrosion can shorten the lifespan of an AC bracket. I’ve found that prevention is easier than repair. Stainless steel brackets, like the Taojun Universal Wall Mounted AC Bracket, resist rust naturally. However, I still take extra precautions. Applying a protective coating to the bracket adds an extra layer of defense.
I also make sure the bracket stays clean. Dirt and debris can trap moisture, which leads to corrosion. A quick wipe-down every few months keeps the bracket looking new. For outdoor units exposed to rain or snow, I use a waterproof cover during harsh weather.
Pro Tip: Elevating the AC unit on the bracket helps prevent contact with wet ground, reducing the risk of rust.
Ensuring Proper Weight Distribution Over Time
Weight distribution plays a crucial role in maintaining stability. I always check that the AC unit sits evenly on the bracket. Uneven weight can cause the bracket to tilt or weaken over time. Rubber pad shock absorbers included with the Taojun bracket help distribute weight evenly and reduce vibrations.
Every few months, I inspect the bracket for signs of strain. If I notice any bending or shifting, I adjust the unit’s position immediately. This small step prevents long-term damage and ensures the system operates efficiently.
Inspiration: Taking care of the details reminds me that small efforts lead to big results. A stable and secure setup brings peace of mind and keeps the AC system running smoothly for years.
Installing universal AC brackets has been one of the most rewarding tasks I’ve tackled. With proper preparation and the right techniques, the process becomes straightforward and stress-free. I’ve found that focusing on each step—choosing the right tools, securing the bracket, and stabilizing the AC unit—makes all the difference.
Reminder: Regular maintenance is the key to keeping your setup strong and reliable. Inspect the brackets, clean them periodically, and ensure weight distribution stays balanced.
By following these steps, I’ve not only avoided common pitfalls but also ensured a safe and stable installation. The Taojun Universal Wall Mounted AC Bracket has proven to be a dependable solution, giving me peace of mind and comfort for years to come.
FAQ
How do I know if the Taojun Universal Wall Mounted AC Bracket is compatible with my AC unit?
I always check the weight and dimensions of my AC unit. Then, I compare them to the bracket’s specifications. The Taojun bracket supports most major brands, so it’s highly versatile. If in doubt, I recommend consulting the product manual for guidance.
Can I install the bracket on any type of wall?
The Taojun bracket works best on cement, brick, or solid walls. I avoid drywall or weak surfaces. For unique wall types, I consult a professional to ensure safety. A strong, load-bearing wall guarantees stability and long-term performance.
What tools do I need for installation?
I always keep a tape measure, drill, torpedo level, and hex keys handy. The Taojun bracket includes essential hardware like bolts and anchors. This makes the process easier. A telescoping magnetic pickup tool is also helpful for retrieving dropped screws in tight spaces.
How can I prevent rust on the bracket?
The Taojun bracket is made of stainless steel, which resists rust. I still clean it regularly to remove dirt and moisture. Applying a protective coating adds extra defense. For outdoor units, I use a waterproof cover during harsh weather to keep the bracket in top condition.
What should I do if the bracket feels wobbly after installation?
I inspect the bolts and screws first. Loose hardware often causes wobbling. Tightening them usually solves the issue. If the problem persists, I check the wall anchors and ensure the bracket is level. Rubber pad shock absorbers also help stabilize the setup.
Tip: Always test the stability of the bracket by gently shaking it after installation. This ensures a secure setup.